My Word...

Hey guys long time no talk huh? Sorry about that but life can get crazy sometimes as I'm sure you all know. Especially around that holiday time!
Speaking of which ... 
Happy Halloween!
Happy Thanksgiving!
Merry Christmas!
And 
Happy New Year!

Alright all caught up haha!

Really though I do hope you guys all had the best holidays and have thoroughly enjoyed this first week of 2019!

So you know how everyone is talking about having a specific, inspiring word for the new year? 
No?
Neither did I.
I didn't even know this was even a thing until the other day to be totally honest haha.
But I now have a word myself!

So here's my word ... 
SELFISH.

Now let me explain!
I don't mean selfish in a rude, self-absorbed, egotistical kind of way, I mean selfish in a healthy way.
How many of you are people pleasers?
How many of you are "Yes-ers"? Aka you say "Yes" to everything and end up in over your head constantly?
How many of you are being pulled in twenty different directions all the time taking care of everybody else except YOU?
Do you see where I'm going with this?


I know for a fact I have a really, REALLY hard time telling people no when they ask me to do something or ask me for help.
Now don't get me wrong, I absolutely LOVE to help out my friends and I love everything I get to do with/for my kids but sometimes I get overwhelmed simply because I lack the ability to say a very simple word ... NO.

Part of my "Selfish in 2019" philosophy is to just nicely decline people when I feel like I need to.
Doesn't sound so hard right?
*insert heavy, nervous breathing here*

I mean it guys it really does make me nervous to think about turning people down or possibly having others be upset with me for it.
(Quick note: If people get mad at you for sticking up for yourself and your mental health than they are NOT the people for you.)
 I love doing things for people but I just can't keep spreading myself so thin that I'm not giving myself the love I deserve.

Does that make sense?
Jeez I hope so.
I know a few people who struggle with this themselves so I'm hoping by writing this post I'll be able to persuade some of you selfless ladies to become SELFISH ladies for 2019.

Now I'm not saying you should drop all of your commitments like hot potatoes but if you're more stressed out by your commitments than fulfilled by them maybe it's time to reevaluate.
If you're a mom and you're thinking "Yeah I barely have time to take a potty break alone." I hear you!
But this is where the work on your part comes in.
Work on making time for yourself the same way you work on making time for the kids.
You've got movie night with them on Friday? Then on wednesday (or whenever) have them go to bed a half hour early and you get a glass of wine (Tea? Coffee? Soda? Any beverage!) and enjoy some time to yourself doing whatever YOU want to do.
As moms we do everything for our kids, our home, our jobs, our spouse/significant other but rarely do we do everything we need to do for us.
Am I right?
Don't you think you deserve some time to just fill your own cup?
To reward yourself and love on yourself and speak words of encouragement over yourself the same way you do to your children?
Think about that for a second?
Think of all the nice things you tell your kids. How you don't bash them when they mess up, but instead reenforce their confidence with words of affirmation. How you snuggle them and tell them you love them everyday.
Imagine the difference we could create if we loved on ourselves the same way.
Think about it.
And don't you think that maybe you'd be a much better mother, wife, employee if you were pouring from an overflowing cup rather than a half full or empty one?
Long story short ladies... 
MAKE YOURSELF A PRIORITY IN 2019 AND EVERY YEAR AFTER!!!
Do it for you, so that you may rise up and thrive in every other aspect of your life.


Living Room Tour & Breakdown!


So after toying with the idea for awhile I think it's finally time for a 
...


I've been asked a few questions recently about where I find the different decor pieces I use to style my space so I figured now was a good time to go ahead and make a post to completely answer everything!

To start off though I'd like to say that this is in no way whatsoever a "brag post". Most of the things you see here were acquired over time and I decorate because I love it, not to show off.

So anyway, let's do it!


Here's a picture of my living room from this morning and I'm pretty pleased to say I think I've finally gotten it to where I want it!

So one of the main questions I get is 
"How do you have such light colored sofas with both kids and pets?!"
My answer to that is ...
I'm just magical like that!
No haha I'm totally kidding.
But really though, it's super simple!
Both my sofa and loveseat are from the Ikea Ektorp Collection and the beauty of this incredible collection is that every single cover comes off and goes into the washing machine! Even the cover that covers the actual sofa itself! Seriously, I tell people all the time, these covers are life changing.
Between two toddlers, two long haired cats and a black dog (who sleeps on the couch) they've really held up.
They've stayed strong through crayon marks, marker lines, blood (yes, blood from a crazy two year old boy), dirty dog paws, cat hairballs (yuck...) and food stains.
Once a week or so I strip all the covers off, including my white throw pillows (which have white covers) that are also from Ikea, and throw them in the washer with our regular detergent.
They hold up great through many cycles of washing and drying.
Once a year or so we do go and buy a new set of covers for both the loveseat and sofa.
Now here's a good tip for you guys.
When you're picking a cover color consider this, the covers you see in my pictures are the beige covers however most people I've seen on Instagram have the white covers but check the difference in price.
It's crazy!
Now I've read reviews for the beige covers and for some reason I've seen a lot of negative ones.
I'm really not sure why since I find them incredibly comfy, durable and nice looking. They aren't really a beige to me, maybe more of an oatmeal.
But anyway, that's the secret to my nice light colored furniture haha!
Ikea is a life saver!


You can see the cover color a little better here. But you see what I mean? They're a very light beige.

Now let's talk lamps.
I have three of these lamps in my home. Two in the living room and one in my entryway. Something that blows my mind is how expensive lamps can be! Isn't it crazy! Like I could never justify a $60 dollar lamp!
So I took my lamp hunt to Walmart and was pleasantly surprised with their selection.
I ended up picking out two of these with a nice canvas textured shade also from Walmart that I believe cost around $5 dollars.
I really love these lamps and think they can't be beat for the price.


*Candle holder: Bath & Body Works
That particular holder isn't on the site right now but they do have some great Fall ones out and also a deal going on where you get $10 off of $30 with the code HELLOFALL !
*White jar and jute candle: Cracker Barrel
*The figurine of the husband and wife is a Willow Tree piece.

You'll notice 90% of the stuff in my home is reasonably priced and I also do alot of Facebook market and Offerup.
Example one being the sofa and loveseat. Both separate Offerup finds (paid $175 for the pair!) and all I had to do was buy new covers.

By the way, the ottoman is also an Ektorp piece and the top is removable to allow for storage inside.
Another thing I do with my rooms is purchase pieces that serve more than one purpose.
Like a storage ottoman as a coffee table!


The way I made the ottoman work two jobs so to speak is by using this Target dollar spot tray to support drinks when guests come over since obviously if you put a drink down on a fabric ottoman it would most likely tip.
Spruce it up with some greenery and cute coasters (both also from Target) and you're good to go!


All the pillows you see in this picture are Target finds except, of course, for the white Ikea ones that I linked above.
The flamingo pillow seems to be discontinued but they do have some good options if you search their site!
The black and white striped pillows are actually the "Hello Spring!" pillows from the dollar spot just flipped around haha.

And that gorgeous farmhouse style sign is from Hobby Lobby!


"Hi" pillow I found on a Target end cap for only $6!
Grey and white patterned rug also ... from Target ... because clearly 99% of my life comes from there haha!
Don't judge me!
Sadly this item was clearance also so I can't find it on their site.

The mirrors up above both end tables are Facebook market finds and I paid $15 for the pair.
Any time I'm looking for something I check Facebook market or Offerup first and probably 80% of the time I find what I'm looking for for a great price.
Plus it's a great way to recycle!


I know I posted this picture in the beginning of this post but I wanted to focus on all the end tables for a minute.
I never set out to have mismatched end tables but I really do love how they look all together.
The one on the left was an Offerup find, the one with multiple basket drawers which I use to hold Legos and puzzles (another multipurpose piece) was a Facebook market find and the two together at the far right are my latest pieces!

So I had been on the hunt for a two story low shelf to use as an end table for that space and didn't have much luck.
And then ... Prime day came to Amazon!
I hopped online and just looked for some on a whim.
And voila!
I ordered two and paid roughly $60.
The look I was trying to create with them was that of a room divider. I wanted to play with the eye and basically corral off the living room from the dining area. And honestly I think it does exactly that!
So here's the link to the tables but apparently they're sold out right now so sorry about that guys.
I'll keep an eye out and be sure to let you guys know if they come back into stock.

Here's a similar one though!
Now, let me tell you these are NOT wooden shelves. They're plastic which was a little disappointing but for the price I can understand.
So far the paint has stuck on just fine.
I did maybe four coats, allowing each coat to fully dry in between.
I do think if you're planning on really using them everyday maybe sand them down before painting or, if you're lazy like me, finish them off with a matte clear spray.

One thing you'll notice about all my end tables is their all the same color.
I used Rust-Oleum Aged Grey on each one and am happy with the results.
It's a chalk paint so you get that matte finish that's very in style right now. and it's super easy to work with.

*Flamingo throw pillows from Target dollar spot.
*Black pom pom throw blanket also from Target.

So guys I think that about sums it up!
I hope you found this post helpful and if you're interested in something I didn't touch on please feel free to comment below or on my Instagram (@Thekangaroofamily).
I hope everyone enjoys the rest of their week and as always ...


Hello, July!


Happy Monday everyone! And welcome to July!
(Yes I'm aware it's already the second, I'm always a little behind these days haha)
How is it even possible that it's July already!?
I swear, time's flying by faster and faster every day.


So how many of you loveys are Christmas in July type gals?
I know I am!
I binge watch QVC Christmas shopping specials (mostly to check out the decor in the background haha) and Hallmark Christmas in July movies.
*sigh* Christmas...

Anyway, back to what I was attempting to say.
Along with Christmas in July I think I'm going to start a fun new tradition


...


Sounds super fun right?!
Haha I can practically hear you guys screaming with joy and anticipation!
Hopefully you can recognize my sarcasm lol

But really though I think this would be a fun challenge to share with you guys!
So let me break down what exactly this challenge would be.

There's carbs in everything.
Fruit's and veggies too.
Now, I'm not talking about some crazy crash diet that excludes almost everything. That's both dangerous and unhealthy.
The carbs im referring to are the "hard" carbs aka bread, rice, pasta.
See? Nothing crazy!

Basically we'd just throw those foods out the window for the month!
This would also mean foods like chips, crackers, tortillas ... all the "good" stuff haha!
Now don't panic!
Stay with me here!
If you're like me, and salty, crunchy carbs are your weakness in life, I've discovered one food that's both healthy and crunchy and may help you curve that craving.

Baby ... carrots.

Wait, wait, wait!
Don't stop reading!
I'm so serious, baby carrots have been my saving grace recently!
And you can eat them with dip to add that salty flavor or plain (I prefer mine plain).
The crunch is just super satisfying haha.

So part two of this challenge would be to workout once a day for an hour.
If you're still reading don't leave!
I don't mean crazy working out.
I simply mean walking, jogging, biking whatever you're into for ONE HOUR PER DAY.
There's 24 hours in a day, we should all be able to devote at least one of those hours to our health.

The goal at the end of the month isn't a number on the scale, it's a personal victory to say "I did it!" and if the number on the scale has changed or your shorts are a little looser than that's an amazing bonus!

So whose in!?
Whose ready to kick this month off with a fun, healthy challenge that could really change you for the better?
I know I am!
So if you're planning on following along, you can stay connected with me easier on Instagram (@Thekangaroofamily) or on Facebook by searching It's Just Blissful Chaos!

I look forward to seeing everyone's progress and I hope that we can all rely on each other for support when those midnight cravings call our names!
Or, in my case, the bag of chips at Chipotle.
Ugh! Self control is key, ladies!


As always ...


Target Toddler Style! Pt.1


Hey Y'all!
So unless you're living under a rock odds are you know of ... Target.
The holy shopping mecca of moms right now!
Whether you're a Target Dollar Spot fan, an end cap explorer or a Starbucks and stroll kind of gal, Target definitely has something for all of us.
Heck, I'm all three of those haha!

But for right now let's turn our attention to the toddler section shall we?

For those of us with little ones, were constantly hunting for clothing that's cute, durable and doesn't break the bank.
Am I right?
So what I thought I could do is share with you guys a few summer pieces I've picked up recently and give you an idea of cost and durability!
Anyways, swimwear will be the main topic of this style post but I'll also be throwing in some random extras that I've found recently as well.

Down here in Florida it's the dead of summer. So unless we're shuffling from AC to AC, you'll find us sitting in the sand at the beach, or poolside with our giant flamingo floaty aka Barb!

Here's beautiful Barb in all her glory! 
Beautiful Barb!
We have a miniature flamingo floaty named Fran too haha so between Barb & Fran we have some killer pool parties haha!
If you follow me on instagram (@Thekangaroofamily) you've seen my recent flamingo obsession spiral out of control lol.

Both of these flamingo bags are coolers from the dollar spot!
And that drink is the new dragon fruit, mango refresher from Starbucks! It is THE drink of the summer. Super refreshing and incredibly delicious! I highly recommend it.


That blow up flamingo is Fran by the way lol but that little pink speaker is also from the dollar spot. I believe it was $10 and is splash proof. It also has a big suction cup on the back so you can attach it to the shower wall. I leave mine attached to my bathroom mirror though.
*That cat bathing suit is not from Target, it's from Old Navy.*


Here's my son James on the way into Target!
My kid's eyes light up when I tell them we're going there haha.
I may have accidentally created some monsters.
Whoops!

Alright, first up we have this super cute suit!

We'll call this the lemon suit since as you can see it's covered in adorable lemons! And that face she's making is me asking her, "What's the face you make when you eat a lemon?!" lol
Speaking of lemons, have you guys seen the dollar spot lemon decor?!
If not, you NEED to!

So this suit is really comfy, according to Kim and even though the background is white, we haven't had any issues with stains as of yet. She's gotten hot pink icing on it from a cupcake and it came right out!

Proof of the icing incident haha. I was for sure the suit was ruined.
But like I said it came right out!

Here's a picture of what the back looks like. The ruffles really give it something special I think.
Next up is Kim's personal favorite!
...


She calls this one her Hawaiian suit and I must say I think she has the name spot on!


The detailing is so vibrant and beautiful!
And there's a synched type bow detail around the waist.

Ruffle edging around the top.
And the little bow detail on the strap is adorable!

All in all this one is made very well, no pulling on the butt (usually that's where I find little pulls from them scooting around on pool steps or on the sand.) and no running colors or lose seams!
Kim's Hawaiian Suit!


Now we"ll talk about some little boy trunks!

These toucans give me L-I-F-E!!!


I have had absolutely no issues with these shorts.
When I first got them home I put them on him and noticed they were a little too big and panicked for a second until I noticed the adjusting strings were inside the waistband!
I actually really like that they're inside because one, he can't mess with them and two, the look is much cleaner without them being visible.


Now let's talk about these lobsters!
Ugh I love these ones almost as much as I love the toucans!


This is his
"Enough, Mama."
face.

These have the same adjusting strings inside the waistband as well by the way which is awesome.
All in all, both of these trunks get a 10/10 rating!
Lobster Trunks!

Hopefully this post was helpful to you guys and gave you some good ideas as to swimwear for your little ones! I just love how stinkin' cute these all are and the prices can't be beat in my opinion!
I hope your days to come are filled with sunshine, pool vibes and palm trees!


Mouth Watering Pumpkin Pie!

As we're about to close out the lovely month of November what better way to say farewell than with a fresh, homemade 


...


I discovered this recipe on Thanksgiving day actually and have been dying to try it out since I'm a total pumpkin pie lover!

So yesterday when the kids were being a little much and I could feel myself burning out at only 10 in the morning we gave it a try.

It actually became a perfect cooking class recipe for the kids as well which was an added bonus! I love when they're able to help me in the kitchen and this particular recipe was such a hit that it will be going into Kim's cookbook!

Alright, so here's the link to this awesome pie
...

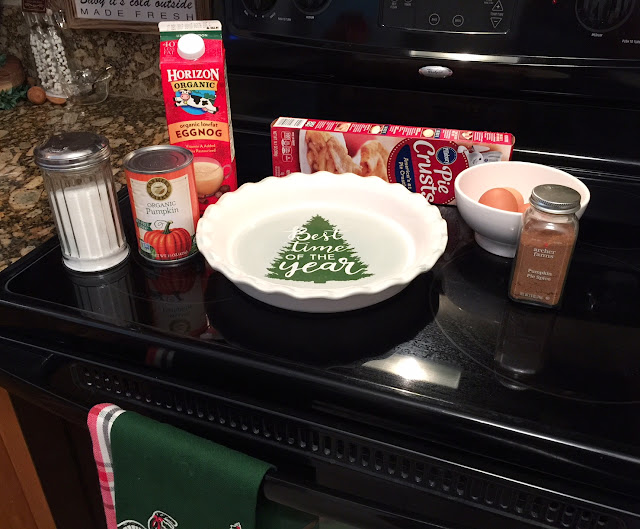
What drew me to this version of pumpkin pie was that instead of using condensed milk or evaporated milk it used eggnog!
Now I don't know about you guys but I don't normally have condensed milk or evaporated milk in my pantry (Fail?) but I did happen to have eggnog in my fridge per usual this time of year which made me love this recipe even more. I also tend to have pumpkin puree on hand all year round too since we're just that big on pumpkin over here.
Pumpkin bread in August happens here for sure!
I just love when I have all the ingredients I need for a recipe on hand without having to run out for something last minute. 
Don't you?


Here's all our supplies! Minus the salt because I forgot to add it to the picture.

I used to be a big fan of Libby's pumpkin products but this is one of those organic items I insist on.


Getting the kids involved! Their favorite parts were the pouring and mixing of course.


 After everything was mixed in nicely I taught Kim how to go around the crimped edges with a fork. It reminded her of that part in Snow White when the little birds do this with their feet!
So cute!


While the pie baked for an hour, James got to have his first sip of Nog! He quickly chugged the whole mug and promptly asked for more ha ha! That's my boy!


After an hour the pie came out of the oven and I set it to cool on the counter for a few hours. We didn't get a chance to have a slice the same day so we dove into it this afternoon after making some fresh whipped cream to go with it! By the time I was able to take a picture this is all that was left!


Also if anyone's curious, my trick for quick, fresh whipped cream is using the blender!


Well there you have it! This pie tasted amazing and I really take my hat off to the subtle eggnog flavor, it really makes it super festive!


Finally! A tree for our master bedroom!

You guys should know by now that not only do I love Christmas but I'm also an avid DIYer! So in this post I've combined those two passions and am ready to give you a teeny tiny tutorial on my quick and easy tomato cage tree!


A goal of mine over the past few years has been to have a tree in each room of the house. So this little tree I was able to throw together last night worked out perfectly!

So first things first, for this project all I had to go purchase was a tomato cage, everything else I already had lying around.

Here's a list of everything I needed:

  • crate (or basket big enough to fit your cage in)
  • lights (and decorations depending on the look you're going for!)
  • old garland


That's it!

Don't mind the horrible quality of this picture, I took it at night so there was terrible lighting. But here's my tomato cage. I picked out a taller version that came pre-painted green. This one was around $8 from Home Depot.


And here's my big pile of old garland. There's three pieces in all and this turned out to be the perfect amount.


So the first thing I did was cut any old light strings off the old garland. Next I unraveled each garland and tried to get them to lay as flat as they could to make wrapping them around the cage easier. Because these garlands had thick, bendable wire hook type things on both ends I didn't even need the florists wire I had envisioned having to use to hold the garland on the cage. I just bent the garlands wire hook around the top most point of the cage and started wrapping down, adjusting the spacing between rows as I went. Whenever I reached the end of one piece, I'd just fasten the next garland on to the one before it and keep going.

Once I was done wrapping the cage, which now resembled an actual little tree, I got the hubby to wedge in into this $10 Michales crate I had lying around the house. My original plan was to use one of my baskets as it's base but I really loved the more rustic crate look instead!


Well, what do you all think?!
For $8 and a half hour's work I think she looks pretty good if I do say so myself!

My tree, after being nestled in it's crate, stands almost 5ft tall! I looked up similar trees and the prices varied from $20 all the way to $60+!
If you're thinking of creating a cheaper version yourself but don't have any random garland pieces laying around I'd recommend checking dollar stores or even waiting until after Christmas and snagging as much as you can for dirt cheap! I'm already thinking ahead about making outdoor versions for next year!

What are some of your favorite festive DIYs you've done? I'd love to see pictures so please post some below! 

Thanks for taking the time to check out my little tree post and as always ...


Search This Blog